Cap embroidery is one of the most popular forms of custom apparel decoration in the USA. From sports teams and construction companies to restaurants and retail brands, embroidered hats help businesses create a professional image. However, digitizing a design for a cap is very different from digitizing artwork for a shirt or jacket. That is why cap embroidery digitizing requires special techniques that account for the shape, structure, and sewing limitations of a hat.
In fact, cap embroidery digitizing involves unique stitch planning, design sequencing, and machine settings that are not commonly used in flat embroidery. Without these specialized methods, logos may shift, distort, or lose detail during production. Therefore, understanding these techniques can help businesses and embroidery shops achieve cleaner and more consistent results.
In this guide, we'll explain the most important methods used in cap digitizing and why they matter for high-quality embroidery.
Understand Why Cap Embroidery Digitizing Requires Special Techniques
Unlike flat garments, caps have a curved surface and a center seam that can create challenges during embroidery. As a result, designs that work perfectly on a polo shirt may not stitch well on a hat.
Digitizers must account for:
- Curved embroidery areas
- Cap center seams
- Fabric tension differences
- Structured front panels
- Limited sewing angles
Because of these factors, specialized digitizing methods help ensure the design remains clean and balanced.
Use Center Out Cap Digitizing to Reduce Distortion
One of the most common techniques is center out cap digitizing.
Instead of stitching from one side to the other, the machine begins near the center of the design and gradually moves outward. This approach helps distribute tension evenly across the cap surface.
For example, imagine pulling a blanket from one corner. The fabric shifts unevenly. However, if you smooth it from the center outward, the material stays more balanced. The same principle applies to cap embroidery.
As a result, center-out stitching helps reduce puckering and logo distortion.
Apply Proper Cap Logo Stitch Direction for Better Results
Stitch direction plays a major role in hat embroidery quality.
Proper cap logo stitch direction helps maintain design shape while reducing fabric movement during sewing. Different logo elements may require different stitch angles depending on their location and size.
For instance:
- Large fills often use angled stitching
- Text may require directional adjustments
- Borders may need separate stitch paths
Therefore, experienced digitizers carefully plan stitch direction before creating the final embroidery file.
Create a Reliable Cap Embroidery Design Setup
Every successful embroidery project begins with a proper cap embroidery design setup.
This preparation stage includes:
- Defining embroidery dimensions
- Planning stitch order
- Adjusting underlay settings
- Managing pull compensation
- Testing stitch paths
Skipping these steps can lead to production problems later.
I once saw a logo stitched directly from a standard flat embroidery file onto a cap. Although the artwork looked good on a screen, the final result appeared stretched and uneven. After the file was redesigned specifically for cap embroidery, the logo stitched perfectly.
That experience highlights why setup matters so much.
Improve Hat Logo Digitizing with Cap-Specific Stitch Planning
Professional hat logo digitizing requires a different approach than standard garment embroidery.
Digitizers must consider the natural shape of the hat while creating stitch sequences that support the design structure.
This often includes:
- Simplifying small details
- Increasing stitch support
- Adjusting lettering
- Changing fill directions
Because hats move differently under embroidery machines, cap-specific planning helps improve the final appearance.
Use 6 Panel Cap Digitizing for Structured Hats
Many embroidered caps use a six-panel construction. These hats include a seam running down the center front of the crown.
As a result, 6 panel cap digitizing requires careful attention to logo placement and stitch sequencing.
Design elements that cross the center seam can become distorted if not digitized properly. Therefore, digitizers often adjust stitch paths to account for this raised area.
This technique helps logos maintain their intended shape and alignment.
Build Better Designs with a Professional Cap Embroidery Design Service
A skilled cap embroidery design service understands how hats behave during production.
Instead of simply converting artwork into stitches, professional digitizers analyze:
- Hat structure
- Design size
- Fabric type
- Machine limitations
- Logo placement
Consequently, the finished embroidery performs better on actual production equipment.
This attention to detail can save both time and money by reducing production issues.
Create Strong Hat Logo Embroidery Files for Production
A high-quality hat logo embroidery file includes much more than stitch information.
The file must account for:
- Stitch order
- Underlay support
- Density adjustments
- Pull compensation
- Fabric movement
Without these settings, even a simple logo may not stitch correctly.
Therefore, experienced digitizers spend time testing and refining embroidery files before final delivery.
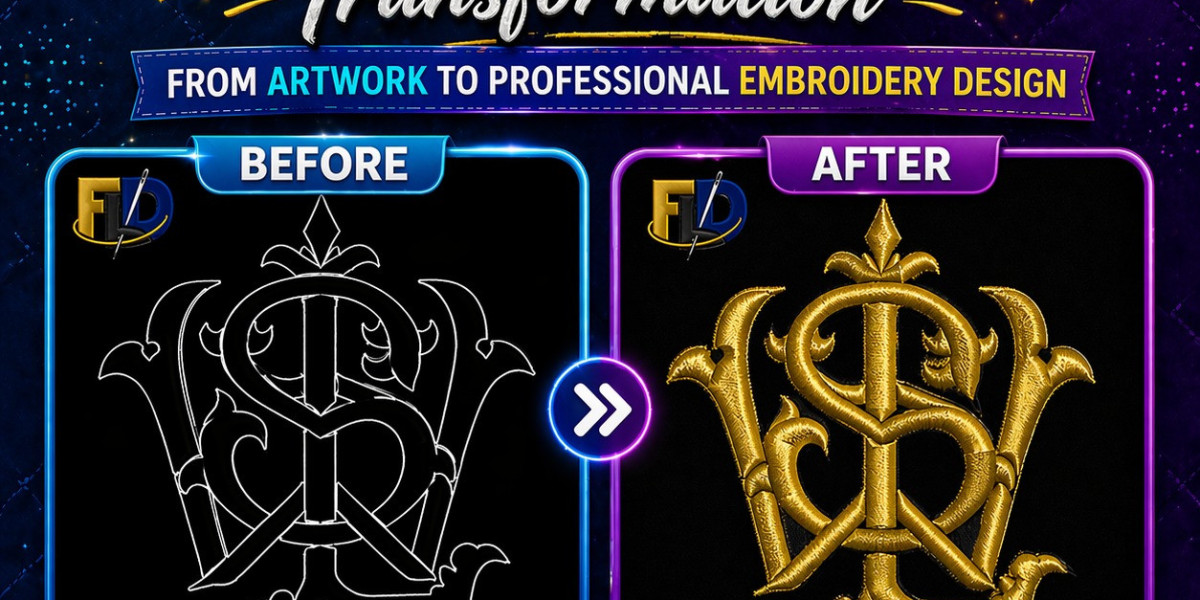
Use 3D Puff Digitizing for Raised Hat Logos
One of the most popular cap embroidery techniques is 3D puff digitizing.
This method uses foam placed beneath the stitches to create a raised appearance. Sports brands, streetwear companies, and promotional hat manufacturers frequently use this style.
However, puff embroidery requires special digitizing adjustments.
Digitizers must:
- Increase satin stitch width
- Adjust stitch density
- Control stitch coverage
- Plan clean foam penetration
Otherwise, the foam may remain visible after stitching.
Because of these requirements, puff embroidery files differ greatly from standard embroidery files.
Create a Strong 3D Puff Cap Logo File
A professional 3D puff cap logo file is designed specifically for foam embroidery.
Certain design elements work better than others when using puff techniques. Bold lettering and large shapes generally produce the best results.
Small details, thin lines, and tiny text may not perform well because the foam needs enough space to create height.
Therefore, digitizers often modify artwork slightly before creating a puff file.
These adjustments help maintain a clean and professional finish.
Understand the Role of Hat Embroidery Punch Service
A professional hat embroidery punch service involves manually converting artwork into stitch instructions for cap production.
Although some software offers automatic digitizing features, manual digitizing typically produces better results.
An experienced digitizer can:
- Control stitch flow
- Improve logo readability
- Reduce machine stops
- Optimize production efficiency
As a result, professionally punched files often run smoother on embroidery machines.
Why Testing Matters in Cap Embroidery Digitizing
Even a well-designed embroidery file should be tested before full production begins.
Test stitching helps identify:
- Thread breaks
- Registration issues
- Density problems
- Alignment concerns
- Fabric distortion
Consequently, many professional digitizers run sample sew-outs before approving a design.
This extra step helps ensure the final product meets expectations.
Avoid Common Mistakes in Hat Logo Digitizing
Many beginners make the mistake of treating cap embroidery the same way as flat embroidery.
Common issues include:
- Excessive stitch density
- Poor stitch direction
- Small unreadable text
- Incorrect sequencing
- Weak underlay support
Fortunately, proper cap digitizing techniques help avoid these problems.
Therefore, investing time in quality digitizing often leads to cleaner production and fewer machine issues.
Conclusion
Professional cap embroidery digitizing involves much more than converting artwork into stitches. Specialized methods such as center out cap digitizing, proper cap logo stitch direction, and advanced 3D puff digitizing help ensure designs stitch accurately on curved hat surfaces. Whether you're creating a hat logo embroidery file, working with a cap embroidery design service, or preparing a 3D puff cap logo file, the right digitizing techniques make a noticeable difference.
By understanding these methods, businesses and embroidery shops can produce cleaner logos, reduce production problems, and achieve better-looking embroidered caps.
FAQs
Why is cap embroidery digitizing different from flat embroidery?
Caps have a curved surface and center seam, which require specialized stitch planning, sequencing, and compensation techniques.
What is center out cap digitizing?
Center out cap digitizing starts stitching near the center of the design and moves outward, helping reduce fabric distortion and improve alignment.
Can every logo be used for 3D puff embroidery?
No. Bold shapes and large lettering work best. Small text and fine details often need modification before creating a 3D puff embroidery file.